
- Electric drill with 16 mm drill bit or quality step drill
- Center punch & hammer
- File or deburring tool
- Vacuum or compressed air for metal swarf cleanup
- High-zinc cold galvanising paint or similar rust treatment
- Spanners/sockets suitable for anchorage plate screws and reel bolts
- Sharp knife or trim tool to cut carpet neatly
- Safety glasses & gloves
These instructions cover the installation of the Datsport retractable inertia reel seat belt kit for Datsun 510/1600 and B110/1200 models. This guide provides the official fitting process for correct alignment, safe operation, and a clean interior finish. Take your time with preparation and positioning — a careful install ensures smooth belt travel, correct retraction, and long-term reliability.
Preparation & Floor Inspection
Prepare the floor area around the base of the anchorage adapter plate. Any rust or corrosion damage must be repaired before fitting the belt assembly. Remove any excess body sound deadener to allow the anchorage plate to sit firmly on the floor pan.

Marking the Anchorage Plate Position
Anchorage plates are mirror images. Use the LH plate as a template to mark out the position of the RH anchorage adapter rear mounting hole recess, and vice versa. Align the plate using the original mounting hole as pictured.
Drilling & Rustproofing the Mounting Hole
After marking out the hole position, drill a 16 mm diameter hole and check the fit of the anchorage plate. It may be necessary to file the hole slightly for a snug fit.
Vacuum any metal swarf from the frame and rust proof the area. We use a high-zinc cold galvanising paint after cleaning.

Once happy with the fit and rust protection, fit the three plate retaining screws and tighten them so the plate sits firmly on the floor pan.

Refitting Carpet & Mounting the Inertia Reel
Replace the carpet and carefully cut a neat hole for the reel mounting bolt. Attach the inertia reel first, then the lap part of the belt. Note the positions of the mountings as per the pictures.

Ensure that the webbing of the belt does not rub on the retractor reel body both when wearing and releasing the belt. When you are sure that the belt runs free without rubbing, fully secure the mounting bolt and fit the reel cover.

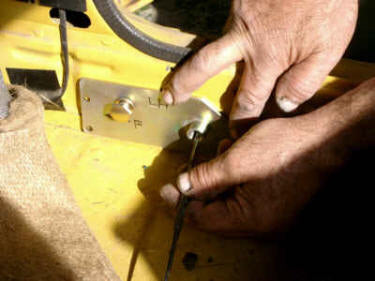
Center Stalk Orientation (LH / RH)
The center stalks must be twisted to align them for LH or RH fitment. This is best done before fitting to the vehicle.
Place the bolt end in a vice (protect the paint on the mount with soft jaws or rags) and rotate the buckle end to the correct alignment for your side of the car.

Once everything is aligned, operate the belt several times from fully retracted to fully extended position. Confirm smooth operation, correct locking behaviour under a sharp pull, and that nothing interferes with seat travel or interior trim.
- Belt webbing rubs on the reel or trim: Check reel mounting angle and location. The reel should sit flat on the anchorage plate and be aligned so the belt feeds straight in and out.
- Reel does not retract smoothly: Make sure the belt is not twisted and that there is no carpet, trim or seat frame interfering with the webbing path.
- Bolt holes don’t line up: Confirm you used the correct anchorage plate (LH vs RH mirror image) and the original floor mounting hole as the reference.
- Cover will not clip on: Carefully examine how the cover clips engage with the reel body. Do not force. Re-seat the cover squarely and apply even pressure.
- Seat travel is restricted: Check the reel location and ensure the reel is mounted rearward enough to clear full fore/aft movement of the seat.
❓ Frequently Asked Questions
Yes. The BFI16FRL kit is designed for Datsun 510/1600 and B110/1200 models, with specific brackets and stalks to suit the factory mounting positions. Always double-check you have the correct kit for your chassis and year model.
No welding is required for a standard install. The supplied anchorage adapter plates and hardware bolt to the existing floor mounts. You may need to trim carpet and remove sound deadener so the plates sit flat.
The anchorage plates are mirror images. Use the LH plate as a template when marking the RH recess (and vice versa). Correct orientation will match the factory mounting point and position the reel correctly behind the seat.
We recommend using the hardware supplied with the kit, as it’s matched to the ADR-approved Datsport belt system. If you choose to reuse original bolts, ensure they are the correct grade, undamaged, and fully compatible with the new components. Any worn or incorrect hardware should be replaced.
The belt should retract smoothly, lock under a sharp pull, and run without rubbing on the reel body or trim. Test this multiple times with the seat in different positions before final use.
Yes. All Datsport seatbelts are fully ADR-approved, and when installed following the manufacturer’s instructions they meet Australian roadworthy requirements. Because local interpretation can vary slightly between states, it’s always recommended to confirm fitment with your authorised inspector if your vehicle has been modified or restored.
Possibly, but you must ensure the belt path is straight, unobstructed and within the belt manufacturer’s guidelines. Some race seats may require specific harness setups instead. If in doubt, contact us before modifying anything.
Recommended Interior Upgrades for Your Seat Belt Install
Quick add to cart — no page reload. Products open in a new tab if you want to read more.


